This is an easy carrot cake recipe from scratch that can be baked in an oven, a Dutch oven, or a solar oven. One cloudy morning, one look at the sky and I knew there would be no solar cooking that day. So Mr. B and I made a quick trip to Costco. Now if you have ever been to a Costco, you will know that there really is no such thing as a “quick” trip to Costco. Nonetheless, we set off with high hopes of getting back quickly so that if the Sun did decide to appear that day, we would still have time to get something in the solar oven. And like most of our un-“quick” trips, the main reason it takes so long, is that I tend to amble up and down every aisle – whether I need motor oil or not! This day was like the others and so I meandered up and down each aisle, giving equal attention to baby toys (no babies in this family), athletic equipment (no athletes either), and exotic gift baskets full of anchovies and chocolate. And don’t forget the sampling. I don’t want to hurt the exhibitors feelings by passing up a tasty morsel of half cooked frozen pizza. On this particular day, a nice woman was passing out teeny tiny squares of carrot cake. After two pass by’s, I was too embarrassed to pass by again – yet I had a craving now for carrot cake. Hurrying home, it was still too cloudy to solar cook, so we pulled out the Dutch oven and quickly threw together this easy carrot cake recipe.
How to Bake a Carrot Cake in a Dutch Oven
- 1 cup oil
- 3 eggs
- 2 TBSP hot water
- 1 tsp vanilla
- 2 cups very finely grated carrots (about 3 - 4 carrots)
- 1 cup flour
- 1½ cups sugar
- 1 tsp baking powder
- ½ tsp baking soda
- ½ tsp salt
- ½ tsp nutmeg
- 1 TBSP cinnamon
- ½ tsp ground cloves
- 1 cup walnuts, chopped
- 1 cup raisins
- In a mixing bowl, combine the oil, eggs, water, and vanilla. Mix well.
- Reserve ½ cup of flour, Add the walnuts and raisins.
- In a bowl, combine the flour, sugar, baking powder, baking soda, and all of the dry spices. Slowly add the flour mixture to the eggs. Mix well until all of the flour is incorporated into the batter.
- Add the carrots and mix well.
- Add the walnuts and raisins and the remaining flour into the mixture.
- Pour the batter into a well greased Dutch Oven.
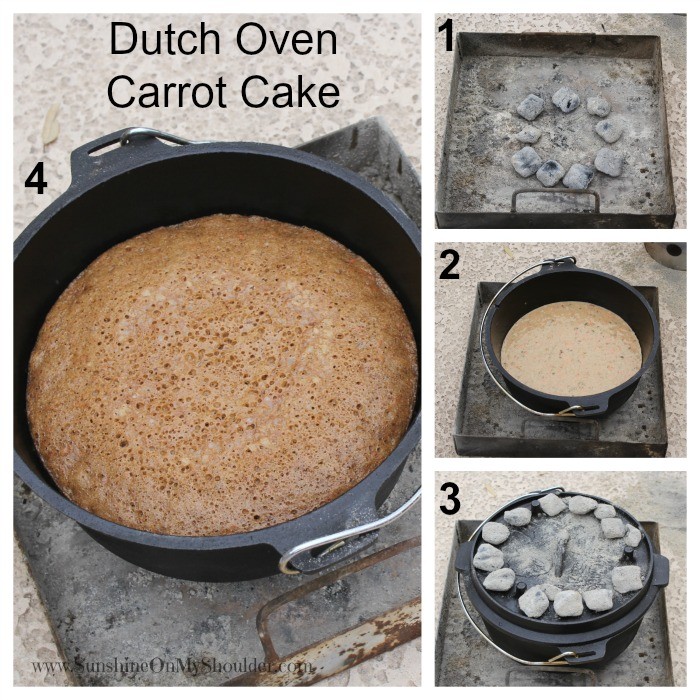
- Place the Dutch oven over the prepared coals. Add enough coals to maintain a baking temperature of 350. Rotate the oven ¼ turn every 15 minutes, and rotate the lid ¼ turn in the opposite direction at the same time.
- Bake until a pick comes out clean. It will take approximately 1 hour to bake, but be sure to test the cake and bake a little longer (or shorter) if necessary.
Before beginning the carrot cake recipe, be sure to light your charcoal so that it can be burning down while you prepare the cake.
If baking this in an indoor oven, preheat the oven to 350. Bake about 40 minutes until a pick comes out clean.
If baking in a solar oven, bake uncovered in a hot solar oven. Pre-heat the solar oven before adding the cake. Keep the sun turned into the sun to maintain the temperature. The time needed to bake will vary depending on the type of solar oven, the temperature of the oven, and the amount of food being cooked. Bake until a pick comes out clean. It will take about 1½ - 2 hours.
Don’t forget the cream cheese frosting for carrot cake.
- 8 oz cream cheese, softened
- 4 oz Greek yogurt
- ½ cup powdered sugar
- 4 TBSP milk
- chopped nuts if desired
- Place the softened cream cheese and the Greek yogurt into a mixing bowl. Mix slowly until it is well blended. Add in the milk and powdered sugar and continue to mix until smooth and creamy. Add a little bit more sugar if it is too thin.
- Place the cooled cake on a plate. Spread the cream cheese frosting on the top. Sprinkle with the chopped nuts if desired.


Oh my goodness! This looks delicious!
I have a few Questions –
1. Do you have a favorite liner for your dutch oven? I’ve seen the foil liners, but I’ve been wondering if a cake pan would work. That way I could nestle the cake pan into the dutch oven and not worry about as much clean up with DO which would be especially nice while camping. I try not to go the disposable route as much as possible.
2. Does the cake come out of the dutch oven cleanly? I’m wondering how you were able to get it out so that you didn’t have to serve straight from the DO.
3. Have you found that you need to make adjustments to your recipes for DO or solar oven cooking? I’m wondering if I were to make this in my Sun Oven, would I need to decrease the moisture?
4. How many briquettes did you use?
Thanks! I can’t wait to try this recipe!
Rachel, here is the formula to determine how many briquettes to use for a 10″ oven : 10 x 2 = 20 briquettes, divide the number in half for top and bottom heat.
For the bottom, subtract 2 ( 10 briquettes – 2 = 8 briquettes on the bottom). For the top, add 2 (10 briquettes + 2 = 10 briquettes on the top). (For an 8″ pan, the formula would be 8×2) I don’t usually use a liner. I just spray my DO really well with PAM. I think because it was a cake I used the baking PAM.
For DO, I do very little alterations. For solar cooking, you may need to adjust the moisture a little because it doesn’t evaporate like in other cooking methods. Something like bread, or cookies, or brownies, doesn’t need to be adjusted. If you are making a soup or chili, it doesn’t matter, there will be lots of liquids. If you need to rehydrate something, you need to make sure there is plenty of liquid but not too much, it isn’t an exact science so I can’t give an exact amount. Cooking meat, I will reduce the liquid. Cooking veggies, depending on what I am doing, I might also reduce the liquid. In a casserole, like au gratin potatoes, where you need plenty of moisture to cook the potatoes, but you also want it to cook down, you will want to adjust. Depending on the recipe, I will decrease the liquid by 1/4 to 1/2 cup. So start with the decreased moisture, watch the food, and if it seems dry add a little more liquid. (That being said, I have also been known to take a couple of spoonfuls of liquid out of it when cooking too, so that it would cook down better). So the answer is yes, you might need to reduce the liquid but it depends. I know that sounds ambiguous, but it is just something that you need to see and get a feel for. Hope that helped. Thanks for the comment Merry
That’s exactly what I needed to know. Thanks!